Sunday, October 31, 2010

Repurposed T-shirts

I found this idea on one of my favorite blogs to follow for recycled t-shirts! I LOVE repurposing old items into cute things, so I needed to give it a try! This is the making of a ringlet scarf!

First, take a few t-shirts that you don't wear anymore. I found a couple plus a tank top! Try to make sure the colors will work together, otherwise it wouldn't make much sense. 

What you need otherwise: scissors and a ruler (if you're a perfectionist).


Cut the hemming off of all the t-shirts and put aside for later.


Next, I cut the shirts into about 1 inch strips because the material was thinner than most t-shirts. This is where the ruler comes in- if you really want all of the strips to be the same width, use the ruler to make markings along the shirt.


All of my shirts were cut and ready to be made into a scarf! I had about 30 strips.


Take each strip and stretch them so they're looser.


See the difference between the stretched and the not-yet-stretched?


Then wrap them loosely around your hand and put to the side. Do this with all of the strips you cut, aside from the hems.


Cut the hems into about 5 inch strips and tie them around 2 ringlets at a time.


Keep linking them together...


Until, voila, finished!


A cute repurposed t-shirt scarf that everyone (even my Zoe girl) will admire!

Good for you for recycling :) Enjoy!

Friday, October 29, 2010

Pumpkin Seeds!!

Oh, how I LOVE autumn!! Pumpkin seeds being one of the reasons....

So this year, David and I bought 2 beautiful, fresh, large pumpkins to de-seed and carve.

First, we took all the gooey seeds out of the pumpkins and let them sit in a bowl of water (to get more goop off). Then we dried them out on paper towels over night.

The next day we peeled them off of the paper towels, making sure that paper towel didn't stick to them.


Then, I poured some olive oil on a cookie sheet and spread the seeds out the best I could.


I poured more olive oil over them (try not to over do it, but make them semi-moist), then salt and pepper. If you want to add more spices, go for it!


The oven was set at 300 degrees. I put them in there for a good 20 minutes, mixing them around halfway through.

And when they were done...


Golden deliciousness in seed form!

Now, I used olive oil but my mother always used butter- this is your decision. I am not big on butter and I thought the olive oil worked out really well.

Enjoy!!

Wednesday, October 27, 2010

More Blogs Coming Soon!

Unfortunately, I lost my camera this past weekend... so... blogs will be continued ASAP!

Sunday, October 17, 2010

Birthday Party Ideas

 I am a college student, which means I am very short on cash. I was having a birthday party this weekend, and of course I wanted super cute decorations!

Things I got for a super cute successful party:
2 pack of balloons ($1.59 ea.)
1 streamer roll ($.99)
2 packs of ribbons ($2.50 total)
Pretty wrapping paper ($.99)
Party game ($1.99)

What I did:
Took my largest picture frame and wrapped it like a beautiful present!
Took half the balloons and hung them from the ceiling using ribbon

Took the remaining streamers and made a cute entrance way
The game was picked up at Party City and it was a lot of fun! They have different versions, but since we are all adults, this seemed to be more appropriate than "pin the tail on the donkey"!

Now... for the most important thing... DESSERTS!
I took some cookies my grandma sent me and defrosted them. Then I went to the infamous Larry's House of Cakes and spent $12 on cookies and cupcakes.
Lindsay brought delicious brownies and my mom gave me some cute Eli's Cheesecake cakes!
TA-DA!
A cute and fun birthday party for under $20!

Friday, October 15, 2010

Homecoming Parade and an Important Message

Hey kids! I have been so busy with homework and planning for a birthday party, so forgive me for not providing you with amazing blogs...

David and I marched in the SIU Homecoming parade last weekend and it was a blast! We marched with the group I am a part of; educ8kdz!

I wanted to spread some word about educ8kdz...

It is a group of the College of Education and Human Services and they do wonders for children in the community all the way to New Orleans. They provide books, fundraising, family fun, and education to children of all walks of life. How wonderful, right?

I love being a part of this amazing group of people, I only hope I will be able to accomplish as much as they have.


Now for my little soapbox moment:

I would like everybody who reads this to think about the amazing things they have done for others and really reflect on it. Keep it dear, because I am sure the people you have helped did. If you haven't done anything for anybody else- it's about time you did (and shame on you)! 

Help the world spin in a positive direction!

Sunday, October 10, 2010

Delicious Thai Soup

I found a really easy recipe for a Thai style soup, and let me tell you- if you like curry, you'll love this soup!
Lindsay and I were quite hungry after the homecoming game, so we wanted to try something hearty and new!

Slice approximately 1 medium onion and 2 cloves of garlic. Throw into a couple tablespoons of heated vegetable oil in a wok. Cook until tender (2-3 minutes)

Then cut 1 large carrot, about 1 cup of broccoli, 1 large zucchini. Throw into the wok with the onion.
Meanwhile, throw together 1.5 cups of coconut milk and 2 cans (14 oz) of vegetable stock into a large pan. Bring to a boil.

Once boiling, add 2 tablespoons of red curry paste, 2 table spoons of soy sauce, and a good handful of rice noodles. Let simmer for 3 to 5 minutes, or until noodles become tender.

Make sure there are no greedy hungry doggies watching for fallen noodles...

Once the noodles swell and tenderize, add the vegetable mix from the wok.
Yum, right?! Once the vegetables simmer in the stock for a couple minutes, add fresh cilantro (to taste) and bean sprouts (I hate them so I didn't add them).
There you have it! DELICIOUS Thai soup!

Friday, October 8, 2010

Getting This Card Thing Down

I had a little free time today (or rather I made some free time) and wanted to attempt another card!

Of course, my dad needed one for the wonderful birthday gift, so I got creative!

First, I used the universal envelope from the Wild Card cartridge, so I'll actually be able to send this one via USPS!
Then using lime green card stock, I cut out the "I Miss You" card from the Paper Pups cartridge.
This is my *favorite* cartridge by the way...
Then I cut out a liner for the card using yellow card stock, which means I have orange to write on!

After using the quick-dry adhesive to out it together, I cut out the "Miss You" letters and glued them onto the inside.
Now I have a cute little "made with love" card to send to my daddy :)

Thursday, October 7, 2010

"Thank You" Card for my Mommy

I wanted to attempt another card today and I succeeded! Except for one minor detail which I'll talk about at the end...

First I started with some cute patterned card stock and cut out the "quotes" die cut on the Wild Card Cricut cartridge.

I used the scoring blade to make it easier to fold.
I then cut out the "blackout" of the same design for a nice little liner to the card.

After I scored that, I glued it on using quick-dry adhesive.
Cute so far, right? Then I used the "porthole" design for a "thank you" quote (I liked it better than the "quote" design).
Then, using the same card stock as the liner, I cut out the envelope and scored it to assemble it easier.

And there you have it! Another cutie-patootie card :)

Now... about that little issue I had-
I tried to cut the envelope at a 5 1/2 size, but my Cricut said it would not fit on the card stock! So here's a warning for all Cricut Personal Electronic Cutter Machine users- DO NOT USE THIS ENVELOPE TYPE IF YOU WOULD LIKE TO SEND IT VIA USPS! It's a little embarrassing, but my mom will now receive this card inside of another envelope.

Tuesday, October 5, 2010

First Attempts at Scrapbooking

As you can see, I'm new at this! I find crafting (of all sorts) very interesting, but never made the time to try it out. So once I bought my Cricut, I decided to give it a whirl!


This is the first attempt I have made at scrapbooking. I would love some advice, comments, hints, etc.! I feel like what I'm doing is so basic in comparison to other people I have come across.

I'll keep an update on this, but don't hold back any thoughts!

Sweet Dog Card for My Grandma

I decided to send out some "thank you" cards to my family for being wonderful and providing me with a great birthday.

For this first card, I used the Wild Card Cricut cartridge for the envelope. I cut the envelope out using teal cardstock, and I cut the liner using lilac.

I then used the Cricut cutter's scoring blade to make nice, foldable creases.

Quick-dry adhesive was used to glue the liner to the envelope and seal the sides.

What a pretty little envelope, no?
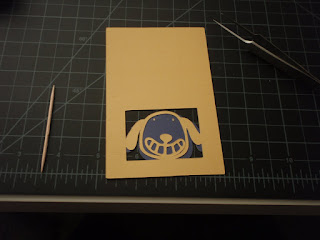
Afterwards, I decided to use another cartridge to create the card. I used the Paper Pups cartridge and chose the "smiley" option (I thought it was adorable).

I also cut out a violet background so the pup can have some life to him (as you can see, I do not use typical colors).

I decided to mod-podge the dog for a sealant. Little did I know, it would wipe those cute yellow eyes right off! I used an orange marker to try to regain them, but it turned out red. Now he's an evil little doggy...
I hope my grandma will get a kick out of those beady evil-looking eyes...

I then cut out a small square of lilac card stock to put behind the evil little guy and voila! My first card created on the Cricut!